Free Feeding Bib Pattern

I'm still working on getting my e-book ready for download, but I thought that in the meantime I would put up some of the projects in it as free tutorials.  This feeding bib is one of my favourites; It's such a lovely way to use up scraps of your favourite fabrics and is really quick and easy to make, even for a beginner.  The pocket at the bottom is very handy for catching spills and when you're finished you can take it off and use the towelled backing for a quick face wipe!

Feeding Bib with Pocket - A free Tutorial and Pattern from Willow and Stitch

Click the link in the image below to download your free copy.

I hope you enjoy this tutorial, I'd love to hear your feedback and if you've made a bib then why not upload a picture to the Willow and Stitch Flickr pool or use the hash tag #willowandstitch on instagram, it'd be great to see what you've made.  

If you liked this pattern then sign up to my newsletter to get notifications of new pattern releases and special offers.  I'll only email when something new and exciting is available.  I hate having my inbox filled with unnecessary emails!  Having said that, feel free to email me if you have any questions about this or other patterns - I never get sick of emails from readers!

willowandstitchdesign@gmail.com

Baby's First Soft Block - Free Tutorial

Baby's first soft blocks - a free tutorial from Willow & Stitch

Every baby needs a set of building blocks and these are the perfect first blocks for your baby. They’re just the right size to hold and there are no hard edges (especially good in the early days when your little darling is liable to involuntarily whack themselves in the face with whatever they’re holding!). They also provide a lovely sensory experience for your child as each side uses a different textured or coloured fabric, just waiting to be explored by little fingers – and mouths.

 For each block you will need:

  • Six 9cm (4”) square scraps of fabric. Try to find as many different textures or colours as possible, think about cotton, silk, satin, corduroy, denim, felt, fleece, wool, linen etc.
  • Six 9cm (4”) squares of medium weight fusible interfacing.
  • Hobby fill / Toy Stuffing.

Instructions:

Cut your fabric squares and use a hot iron to affix a square of interfacing to each one.  

Make a Row:

Take 4 of your fabric squares and place them in a row. Sew a 1cm (1/2”) seam to join each block to the next. Start and stop each row of stitching 1cm (1/2”) from either edge.

Using a hot steam iron, press all seams towards the bottom block in the row. 

Place the remaining two squares on either side of the first square in your row of 4.

Join square B to square 1, sewing with a 1cm (1/2") seam and beginning and ending your row of stitching 1cm (1/2") from either edge as before.  Repeat to join square A to the opposite side of square 1. 

Fold square A down so that side 2 meets the second square in your row. Align the edges, making sure that any other seam allowances are pinned out of the way of your seam. Join with a 1cm (1/2") seam, beginning and ending your stitching 1cm (1/2") from either edge of the square.

Repeat to join side 3 of square A to square 3, and side 4 of square A to square 4.  Each time be sure to keep all other squares and seam allowances out of the way and begin and end stitching 1cm (1/2") from the edges.

Join the top edge of square 1 to the bottom edge of square 4 in the same manner to form a box with an open lid. Just like this:

Sew 2 more sides of the lid of the box closed in the same way as before.  Leave one edge open.  Press the seam allowances on this edge to the wrong side. Turn the block to the right side.  Use your fingers to push out the corners.

Fill your block with toy stuffing / hobby fill.  Press it into the corners and along the edges but don't over fill the block or it will end up looking more like a ball!  Loosely packing the stuffing also means that the block is easier for your baby to grasp.

Seal the last side of your block using an invisible slip stitch and you're done!

I hope you've enjoyed this tutorial.  I always love to hear your comments and feedback!

Lavender Wheat Bag Tutorial

Lavender Wheat Bag Tutorial

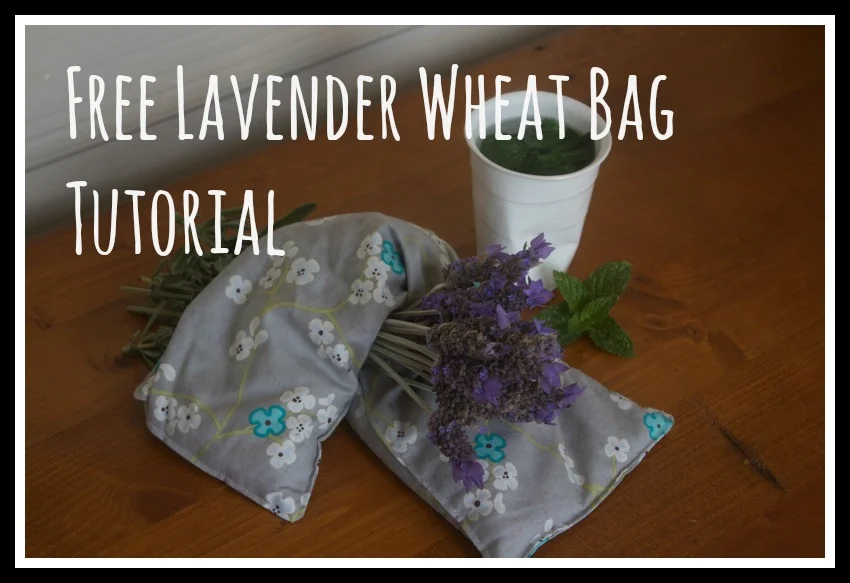
I love wheat bags, they are a wonderful, natural way to soothe away aches and pains. I was first introduced to their magical properties when I was expecting my first baby because they are great for easing back pain during pregnancy, and also work wonders on early labour contractions and post-partum cramps. Since then I've found that they are perfect for relaxing tense shoulders caused by feeding or carrying a baby for hours on end. Also very useful when you're in pain from carrying preschoolers who are really much to big to be carried, or from spending 20 minutes on your knees trying to pick up all the lego which has been evenly distributed over the entire house.

These wheat bags contain dried lavender which has a soothing and calming effect. Lavender can be used to treat tension, depression, exhaustion, headaches and migraines – making it perfect for new mums and not so new mums alike.  I think these also make really nice gifts - for mums, grandmas, aunties, teachers - you name it.  They also have the added bonus that they take about 5 minutes to sew - perfect for last minute!

Warm your wheat bag by heating it in the microwave with a glass of water for 1-2 minutes. 

You will need:

  •  Two 42 x 18cm (16.5 x 7") rectangles of fabric
  • 900g (2 lb) of wheat
  • 2 tbsp dried lavender.
  • A funnel

You can buy wheat at most wholefood stores or even at some of the larger pet supplies stores. Dried lavender can also be bought in wholefood stores, online, or perhaps you have some lavender in the garden? Cut the stems and hang a bunch upside down to dry for a few weeks. 

Directions:

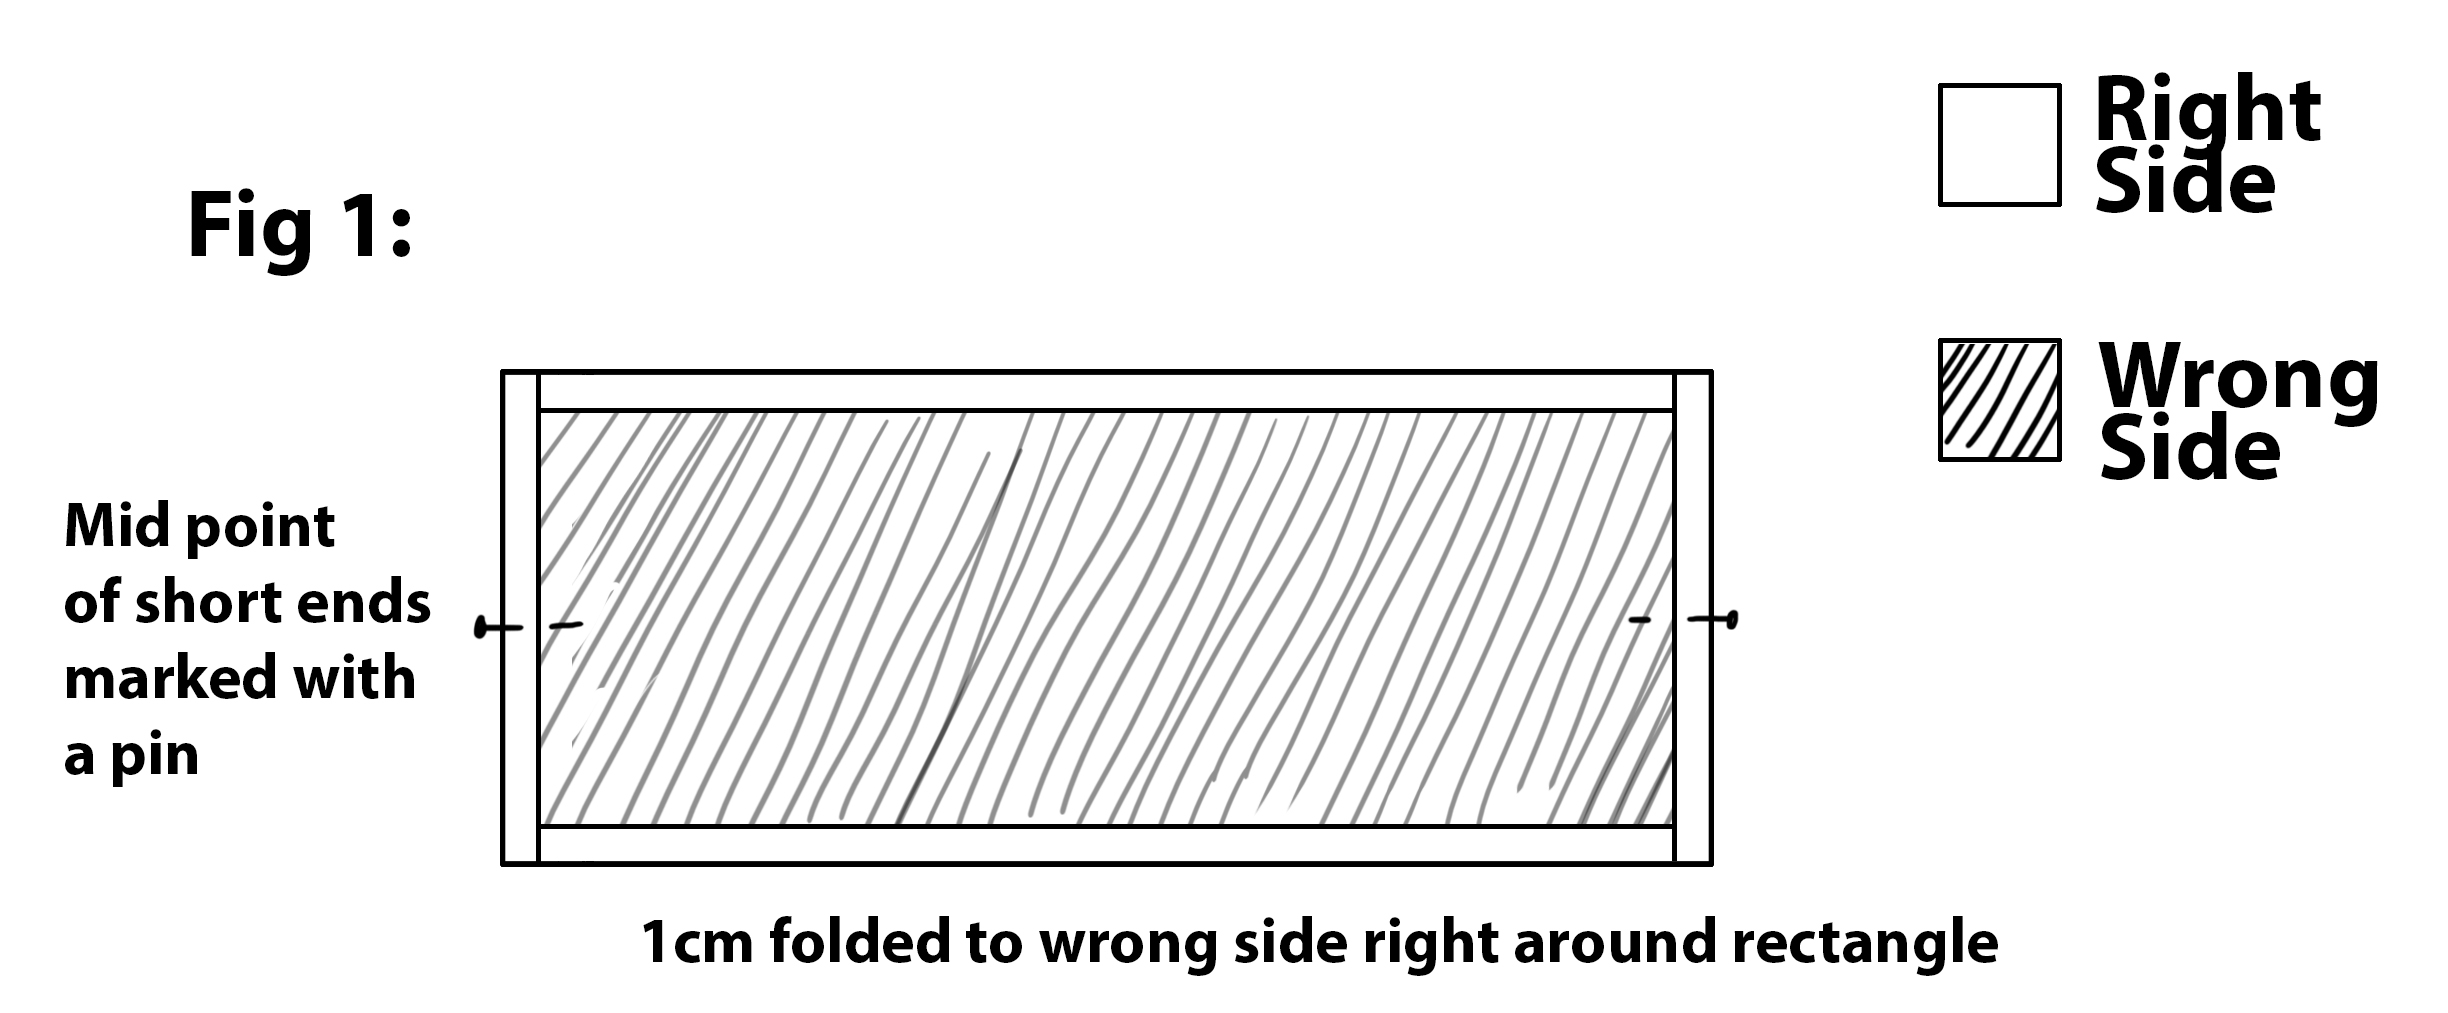
Place your two fabric rectangles on top of each other, right sides together. Join the pieces, sewing with a 1cm (1/2") seam allowance, right around all 4 edges. Leave a 5cm (2") turning / filling hole at one of the short ends. Remember to backstitch at either side of your turning hole.

Snip off the seam allowance at the corners, taking care not to cut through your stitching.

Turn fabric to the right side using a knitting needle or chopstick to push out the corners. Press with a warm steam iron.

Topstitch 5mm from the edge along both long sides of the wheat bag and along the short side without the turning hole.

Mix 2 tablespoons of dried lavender with 900g (2 lb) of wheat and use the funnel to pour it into the wheat bag through the turning hole.  Pour until the bag is about half full. Taking care not to spill the contents, pin and topstitch the remaining short edge to seal your turning / filling hole. 


Free Wooden Teething Ring Tutorial

Free Teething Ring Tutorial and Pattern from Willow & Stitch

This simple yet beautiful teething ring provides 3 different textures for your baby to experience, the wooden ring is perfect for sore little gums, while the fabric ears provide something soft to chew on, are easy to grip and have the added bonus of mopping up all that dribble!  The fabric can easily be removed and washed. It is simple and quick to make and would be a perfect baby shower gift. Team it with a coordinating feeding bib or burp cloth set for a beautiful gift.

You will need:

  • 55 x 12 cm (22 x 5") of towelling
  •  55 x 12 cm (22 x 5") of cotton
  • 1 wooden teething ring, approx 6cm (2 1/2") in diameter
  • Rotary cutter and cutting mat (optional)
  • A chopstick or knitting needle to assist with turning fabric to the right side.

Before you start:

  • Use 1cm (1/2") seam allowance unless otherwise stated.
  • Remember to wash, dry and press all fabrics before cutting.
  • Wooden teething rings can be found in many stores on Etsy.com. They’re very inexpensive so buy a few for future projects. 

Method:

1. Download the pattern template using the link above. Print at 100%.  Set page scaling to 'None' and do not check any options such as 'Shrink to Fit'  Printing on A4 or US Letter paper will work fine.  There is a 1" (2.5cm) Square on the page which you can measure after printing to ensure that your pattern piece is the correct size.

2. Using the pattern piece provided, cut one from your towelling and one from your cotton. Take care not to stretch the towelling as you cut it (a rotary cutter is helpful here).  Place the pieces one over the other, right sides together and pin in place.  Join the two pieces by sewing right around the edge. Leave a 10cm (4") gap for turning at the end of one of the long sides.

3. Snip corners and trim seam allowances to 5mm (1/4"). Clip seams at 1cm (1/2") intervals along curved edges, taking care not to cut through your line of stitching

4. Turn fabric to the right side. This may be quite tight (which is why we trimmed our seam allowances) so work slowly and gently, using a chopstick or similar to push the fabric through. Press with a hot steam iron.

5. Topstitch right around the edge of the teether, closing the turning hole.

6. Knot the fabric around the ring as follows:

7. Fold your fabric in half and pull the looped end half way through the wooden ring as shown above.  Fold the ends of the fabric back under the wooden ring and pass them through the looped end of your fabric:

8. Check that the fabric is lying nice and flat and pull tight. 

9. Turn the teether over and place a few stitches at the point where the two sides meet (see illustration below).  This will stop the fabric from sliding off but will still allow it to be removed for washing.

You're done.  All ready for munching!

I hope you enjoyed this tutorial.  I always love to hear your comments and see what you have made.  Get sharing with #WillowAndStitch on Instagram or add your photos to the Willow and Stitch Flickr pool.  

Woodland Creatures Felt Mask PDF Sewing Patterns

I'm on a roll!  My second PDF Felt Mask Pattern is up in the Willow and Stitch Etsy Shop. As with the Superhero Masks, the pattern also comes with free printables which can be printed onto card, then coloured or painted, and worn.  I think this would be a lovely activity for a children's birthday party or just a rainy day afternoon.  Check out my post on Superhero Masks for more details on how to use the printable masks.

Woodland Creatures Felt Mask PDF Sewing Pattern - Fawn, Fox, Owl and Bunny

I really love these little woodland creatures, although I'd be hard pressed to tell you which my favourite is.  Given the proximity to Easter, I think it might have to be the Bunny at the moment.  There's just something about the very word 'Woodland' which, for me, conjures up all sorts of fantastic and magical images.  It brings to mind stories of fairies and elves and toadstools, trees with secret hidden doors in their trunks.  Images of tiny glades, dappled sunlight, spring flowers, babbling brooks.  The soft crunch of leaves and twigs underfoot, the stillness of the air, perfect quiet.  The damp earthy smell; wild garlic and Bluebells.  I could almost be there.  It makes me long for springtime in England. 

Superhero Mask PDF patterns now available!

I'm super excited to announce that the PDF patterns for my felt Superhero Masks are now available in my Etsy store.  Superheroes #1 includes patterns for Captain America, Iron Man and The Hulk.  

The PDF file is available for immediate download after checkout and includes a materials and supply list, illustrated step by step instructions in English, full size pattern pieces for each mask and hints and tips for a better finish.

Patterns are suitable for beginners, and are quick, easy and fun to make.

As an added bonus I have included free printable mask templates for each design.  These can be printed onto card, then coloured or painted and cut out to form a mask.  Perfect for rainy days or birthday parties.

For the Card masks you will need:

  • 200gsm Paper / Card (or heavier if your printer will accept it)
  • Paints, markers, crayons or pencils.
  • Elastic string
  • A hole punch or sharp point for making the elastic holes.

Print the cardboard template pages (select pages 10, 12 and 14) onto your card or paper. When printing be sure to print at full size (do not scale).  There is a 1 inch test square on each page which you can measure to check that patterns have printed at the right size.

Colour or paint the masks.

Imagine the masterpieces your own kids could create….

Imagine the masterpieces your own kids could create….

Cut around the edge of the mask and cut out the eye holes.

Punch holes in the positions marked on each side and thread elastic string through.  Adjust to the required length and tie off.

You're done! Superheroes are ready to go!


The Best (And Easiest!) Burp Cloth Tutorial.

Burp Cloth Tutorial

There’s nothing that says ‘new mum chic’ like milky stains on your shoulder, and while we wear them like a badge of honour, it’s sometimes nice to have your clothes stay clean for more than 5 minutes; and it’s always nice to cut down on the laundry a little.  Protect your clothes and add a touch of beauty to your day at the same time with these lovely (and very functional) burp cloths.

This project is so, so easy. In fact, given that they are made from old-fashioned cloth nappies I’m not even sure it really counts as sewing, but I’ve spent a lot of time trying out different designs and I’m convinced that these are the best. They’re big enough to protect from largish pukes, super absorbent and soft for wiping little chins. The fact that they’re so easy is just an added bonus.


You will need:

1 packet of cloth towelling nappies (you can buy these online or from most baby supplies stores)

1 62cm x 20cm piece of printed cotton fabric per towel

Note: These measurements work for standard sized cloth nappies: 60x60cm. If your nappies are a different size then calculate the size of fabric needed as follows:

The length is the length of your nappy plus 2cm.

The width is the width of your nappy divided by 3.

Cutting mat, rotary cutter and ruler (optional)


Before you start:

Use a 1cm seam allowance unless otherwise stated.

Remember to wash, dry and press all fabrics (and the cloth nappies) before cutting.


Directions:

1. Cut your decorative cotton rectangle(s). It is easiest to do this using a rotary cutter and cutting mat as you can ensure that your edges are straight and your corners are right angles.

2. Using an iron, press 1 cm to the wrong side along each edge of your fabric. Measure and mark the midpoint of each short end with a pin. Fig 1.

Burp Cloth fig 1

3. Find and mark the midpoint of 2 opposite sides of your cloth nappy.  With both pieces right side up, centre the fabric rectangle on one of the cloth nappies, aligning the middle of the fabric with the mid point of each edge of the cloth nappy. Pin in place right around the fabric.

4. Using a complementary coloured thread on top and a white thread underneath, topstitch a few millimetres from the edge right around your decorative fabric to secure it to the nappy.

When your day is not quite as perfect as it looks on Instagram

This was our day today, exactly as it appeared on Instagram.  Or rather, exactly as it would have appeared on Instagram, IF I could have been bothered to post all of it.

We had such a great day! We played with stamps and ink, we painted, we got a wonderful harvest of delicious 'lemon raindrop tomatoes' as Jacob calls them, from the garden.  We planted out the peas, sweet peas and the spaghetti squash.  We got to taste the very first raspberries from the canes that we planted in spring.  We went to the park and climbed and swung and laughed with friends.  We built train tracks and marble runs.  We baked a delicious pumpkin bread and indulged in a bit of art and crafts with a cup of tea.

We had a great old time today. Today was FANTASTIC!  Wasn't it? Well, yes and no.  There really were some lovely moments, but the Instagram photos don't really tell the whole picture. They don't show you the moment where Jacob wet himself for the second time because he didn't want to stop playing and go to the toilet and I got cross because our washing machine is broken and the laundry pile has reached a ridiculous height.  They don't show you the kids melting down in tears when it was time to leave the park.  They don't show you the 15 minutes that I spent trying to comb the knots out of Ella's wild hair.  They don't show you the 100th time that I had to tell them to "STOP SWINGING THOSE STICKS AROUND - YOU ARE GOING TO TAKE SOMEBODY'S EYE OUT".  They don't really give you much insight into what our day was actually like.  Sometimes I think that this is a problem.  I am being fraudulent.  I am deceiving you.  I am editing my life.  Removing the ugly bits and painting a false picture. 

That's one way to look at it anyway.  Do you want to see the tantrums? The wet undies? The mess? I'm not sure you do; not all of it anyway.  You're smart enough to know that this Instagram feed is not the whole story.  That of course there are times when we are all grumpy, times when the kids cry and whine and drive me crazy, times when I loose my cool, when I yell and whole weeks where the house looks like it has been hit by a particularly violent tornado.  

The photos that I put on Instagram aren't an attempt to con you into thinking that my life and my children are perfect.  They are my attempt to find and recognise the beautiful moments in the most ordinary of days.  A way of focusing on the positive and taking pleasure in the smallest things. Of practicing mindfulness and noticing all the tiny things.

At the end of the day, my Instagram photos make me forget all the crap.  They are a reflections of the things that I choose to remember.  They make me smile at the world and I hope they make you smile too.

A Quilt for Baby Olive

IMG_0945.jpg

This is the playmat / quilt which I made for my new little niece, Olive. I'm not a quilter and they usually turn out full of 'rustic charm' (i.e. slightly wonky and rather uneven) but I'm really pleased with this one.  I LOVE the colours, which I chose because I thought they would go well with my sister's house and because we didn't know if she was having a boy or a girl so it needed to be pretty gender neutral.

I chose a very simple design for obvious reasons!  The finished quilt measured 140cm x 110cm wide (so that i could use a single piece of backing fabric). I pretty much just cut strips of my fabrics in 3 different widths - I think they were 8, 10 and 12cm (approx 3, 4 and 5").  I sorted the strips by width and sewed all of the same ones together, then cut the strips up into pieces which ranged from about 70 - 90cm (2-3 feet).

I played around with the arrangement of my strips until I was happy with them (all the while trying to fend off the cat who seemed hell bent on sitting on my fabric as usual! Does anyone else have this problem? - it happens EVERY TIME!).  I then cut some strips of white fabric in the same widths, sewing them to the ends of my patterned fabric to make each one the right width (or wider). I did this very imprecisely and then trimmed them afterwards.

I bought the bias binding (because, quite frankly, I HATE making bias binding - it's like the bane of my life! OK, well that might be a little bit of an overstatement, but I do find it very annoying.  It's worth it sometimes of course, but still… if you can buy a lovely one like this then why bother?!)

It's hand quilted, because any time I try to quilt on my sewing machine it just ends up all puckered. Also, I wanted to be able to sit in front of the TV with my feet up, re-watching episodes of The West Wing while I did it (I may be a little obsessed with that show…)

I can't remember the name of the backing fabric, but I do love it so! Can anyone enlighten me?