A Week of Tees

So the birthday presents are finally all made - having taken waaay longer than I expected they would, and before I turn my attention to the gorgeous stack of fabrics sitting patiently in my cupboard, just crying out to be turned into Geranium Dresses, Junebug Dresses and Gumnut Dresses, I am going to do something for myself.  Something just for me.  

My wardrobe is pitifully depleated of T-shirts and I have a huge stack of lovely knits begging to be used.  So, I am going to put everything else to one side and declare this to be Selfish Sewing Week.   Who's with me on this one?

I'm going to try to make a top every day for the next week (yikes!) I have a couple of patterns that I want to use, but I think mostly I'm going to be designing them myself so I should have a few more projects to add to my Patterns and Tutorials page by the end of the week as an added bonus.

I'm really looking forward to the chance to make some things for myself and to make a dent in my stash.  I don't often sew for myself and I feel like committing to a whole week of selfish sewing is pretty much the only way to make sure I don't get distracted with other projects. 

So.  First up:

Monday Tee.jpg

Sorry but making and blogging about a Tee every day this week, on top of work, housework and general kiddy wrangling is pretty much going to stretch me to my limit as it is. I'm afraid there is simply nothing left for imaginative pattern naming! So, the 'Monday Tee' it is.

Monday Tee
Monday Tee photobomb
Monday Tee
Monday Tee photobomb

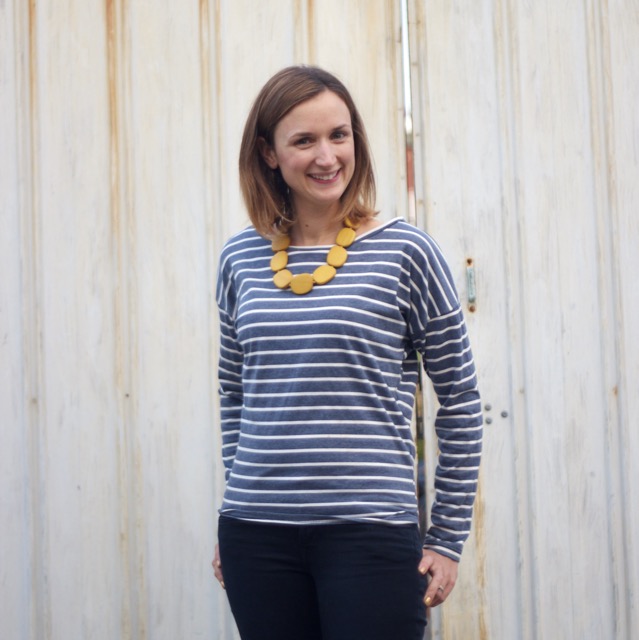
Cheeky little photobomber!

I'm really pleased with this tee.  It's such a simple style, but I do love the shape.  It has a lovely neckline, dropped shoulder seams, tapered waist and perfectly cosy long sleeves.  Stay tuned for the Pattern and Tutorial; Coming up next!

A Beginner's Guide to Sewing With Knits

A Beginners guide to sewing with knits

I am going to be doing a lot of selfish sewing this week and am hoping to be able to get a couple more free patterns up for you at the same time (yay!).  But since most of them are going to be Tees I thought that it might be helpful to write a guide to sewing with knits for those of you who would like to try these patterns but are just TERRIFIED OF SEWING WITH KNITS!

Okay?  So here we go:

The first point to make about sewing with Knits is that it is NOTHING TO FREAK OUT ABOUT!  I used to have such a fear for sewing with knits until one of my lovely friends who has taught me a lot about sewing, gently pointed out that this was a completely irrational fear and very kindly guided me through my initial panic.  I have to say that she was right and knits are now one of my favourite things to sew.  A few simple techniques are all you need to get started and the best way to learn is to just go for it!  Buy some cheap fabric that you are not scared to ruin and just start sewing.  It won’t take you long to figure it out and it is so worth investing the time to learn because once you feel confident you will find a whole new world of sewing opens up to you.  (That was my experience anyway!)

Second important point: YOU DO NOT NEED A SERGER  / overlocker to sew these tees.  I am lucky enough to have one so I often use it but it is definitely not compulsory.  You can easily sew every one of these tees with a sewing machine and they require no specialist techniques. 

One thing you do need however is a STRETCH OR BALLPOINT NEEDLE.  Stretch needles have a slightly rounded tip so that they will slide into the gaps between threads in your fabric, rather than cutting through the threads (as a sharp needle could do) which can result in runs and holes in you fabric (exactly as it would in stockings / pantyhose).

Cutting Pattern Pieces:

When cutting out pattern pieces from a knit fabric it is best to USE A CUTTING MAT AND ROTARY CUTTER  if you have one.  Using a mat allows you to lay your fabric flat and ensures that it will not stretch and become misshapen as you cut it.  This can easily happen when using scissors as you have to lift the fabric in order to be able to cut it.  

TIP:  A rotary cutter with a smaller diameter blade is useful for cutting around tighter curves or corners.

When sewing with knit fabrics, often the SEAM NEEDS TO BE ABLE TO STRETCH along with the fabric.  If you just sew a straight seam you run the risk of either not being able to put on your garment or of the seam thread snapping. There are several ways to achieve a seam which can stretch:

1. USE A STRETCH STITCH: Many sewing machines have a stretch stitch. The one on my sewing machine looks like this: (#6)

2. USE A ZIGZAG STITCH: If your sewing machine doesn’t have a specialist stretch stitch then you can use a simple zigzag stitch.  If you don’t need a lot of stretch in your seam then you can make your zigzag quite narrow.  If you need it to stretch a lot you will need to use a wider zigzag. 

3. USE A SERGER / Overlocker.  If you have a serger / overlocker you can use it to sew these seams.  Serger stitches allow some stretching of the fabric and have the added bonus of tidying up the seam allowance at the same time.

Serger seam finish

Take a scrap of the fabric you are going to be working with and have a play with some of these stitches.  Try stretching your stitching afterwards to see how it reacts.

HEMMING

There are 2 main ways of hemming a knit garment.  The simplest way is to use a zigzag stitch like this:

Zigzag hem

If you’re feeling a little more adventurous you could try using a twin needle which is the finish traditionally used for Tees, it looks like this:

Using a twin needle is nowhere near as complicated as you would imagine.  Twin needles look like this and fit onto your machine in exactly the same way as an ordinary needle. 

twin needle

The only difference is that you need two spools of thread on top.  On my Janome sewing machine I place the second spool (a bobbin) on the bobbing winder.  I have used 3 different colours here for clarity.

twin needle machine threading

Thread your sewing machine as usual, with both strands of thread together.  When you get to the needle you will need to pass one thread through the usual guide and thread the left hand needle. Pass the second thread through a second guide to the right of the other, then through the second needle. 

Set your sewing machine to an ordinary straight stitch and sew! (I usually increase my stitch length to about 3mm as I find it gives a neater finish).  Your finished stitches will look like this from the right side:

Twin needle Hem right side

And like this from the wrong side:

Twin needle hem wrong side

 And I think that's pretty much all you need to know for the time being.   I hope you have found this guide useful. If you need any more help then feel free to ask questions.  There is also a lot of information out there on the big old inter-web so go and have a look around, then take a deep breath and JUST BEGIN.  It'll be the best thing you ever did... (or one of them anyway!)


Free Feeding Bib Pattern

I'm still working on getting my e-book ready for download, but I thought that in the meantime I would put up some of the projects in it as free tutorials.  This feeding bib is one of my favourites; It's such a lovely way to use up scraps of your favourite fabrics and is really quick and easy to make, even for a beginner.  The pocket at the bottom is very handy for catching spills and when you're finished you can take it off and use the towelled backing for a quick face wipe!

Feeding Bib with Pocket - A free Tutorial and Pattern from Willow and Stitch

Click the link in the image below to download your free copy.

I hope you enjoy this tutorial, I'd love to hear your feedback and if you've made a bib then why not upload a picture to the Willow and Stitch Flickr pool or use the hash tag #willowandstitch on instagram, it'd be great to see what you've made.  

If you liked this pattern then sign up to my newsletter to get notifications of new pattern releases and special offers.  I'll only email when something new and exciting is available.  I hate having my inbox filled with unnecessary emails!  Having said that, feel free to email me if you have any questions about this or other patterns - I never get sick of emails from readers!

willowandstitchdesign@gmail.com

Lavender Wheat Bag Tutorial

Lavender Wheat Bag Tutorial

I love wheat bags, they are a wonderful, natural way to soothe away aches and pains. I was first introduced to their magical properties when I was expecting my first baby because they are great for easing back pain during pregnancy, and also work wonders on early labour contractions and post-partum cramps. Since then I've found that they are perfect for relaxing tense shoulders caused by feeding or carrying a baby for hours on end. Also very useful when you're in pain from carrying preschoolers who are really much to big to be carried, or from spending 20 minutes on your knees trying to pick up all the lego which has been evenly distributed over the entire house.

These wheat bags contain dried lavender which has a soothing and calming effect. Lavender can be used to treat tension, depression, exhaustion, headaches and migraines – making it perfect for new mums and not so new mums alike.  I think these also make really nice gifts - for mums, grandmas, aunties, teachers - you name it.  They also have the added bonus that they take about 5 minutes to sew - perfect for last minute!

Warm your wheat bag by heating it in the microwave with a glass of water for 1-2 minutes. 

You will need:

  •  Two 42 x 18cm (16.5 x 7") rectangles of fabric
  • 900g (2 lb) of wheat
  • 2 tbsp dried lavender.
  • A funnel

You can buy wheat at most wholefood stores or even at some of the larger pet supplies stores. Dried lavender can also be bought in wholefood stores, online, or perhaps you have some lavender in the garden? Cut the stems and hang a bunch upside down to dry for a few weeks. 

Directions:

Place your two fabric rectangles on top of each other, right sides together. Join the pieces, sewing with a 1cm (1/2") seam allowance, right around all 4 edges. Leave a 5cm (2") turning / filling hole at one of the short ends. Remember to backstitch at either side of your turning hole.

Snip off the seam allowance at the corners, taking care not to cut through your stitching.

Turn fabric to the right side using a knitting needle or chopstick to push out the corners. Press with a warm steam iron.

Topstitch 5mm from the edge along both long sides of the wheat bag and along the short side without the turning hole.

Mix 2 tablespoons of dried lavender with 900g (2 lb) of wheat and use the funnel to pour it into the wheat bag through the turning hole.  Pour until the bag is about half full. Taking care not to spill the contents, pin and topstitch the remaining short edge to seal your turning / filling hole. 


Free Wooden Teething Ring Tutorial

Free Teething Ring Tutorial and Pattern from Willow & Stitch

This simple yet beautiful teething ring provides 3 different textures for your baby to experience, the wooden ring is perfect for sore little gums, while the fabric ears provide something soft to chew on, are easy to grip and have the added bonus of mopping up all that dribble!  The fabric can easily be removed and washed. It is simple and quick to make and would be a perfect baby shower gift. Team it with a coordinating feeding bib or burp cloth set for a beautiful gift.

You will need:

  • 55 x 12 cm (22 x 5") of towelling
  •  55 x 12 cm (22 x 5") of cotton
  • 1 wooden teething ring, approx 6cm (2 1/2") in diameter
  • Rotary cutter and cutting mat (optional)
  • A chopstick or knitting needle to assist with turning fabric to the right side.

Before you start:

  • Use 1cm (1/2") seam allowance unless otherwise stated.
  • Remember to wash, dry and press all fabrics before cutting.
  • Wooden teething rings can be found in many stores on Etsy.com. They’re very inexpensive so buy a few for future projects. 

Method:

1. Download the pattern template using the link above. Print at 100%.  Set page scaling to 'None' and do not check any options such as 'Shrink to Fit'  Printing on A4 or US Letter paper will work fine.  There is a 1" (2.5cm) Square on the page which you can measure after printing to ensure that your pattern piece is the correct size.

2. Using the pattern piece provided, cut one from your towelling and one from your cotton. Take care not to stretch the towelling as you cut it (a rotary cutter is helpful here).  Place the pieces one over the other, right sides together and pin in place.  Join the two pieces by sewing right around the edge. Leave a 10cm (4") gap for turning at the end of one of the long sides.

3. Snip corners and trim seam allowances to 5mm (1/4"). Clip seams at 1cm (1/2") intervals along curved edges, taking care not to cut through your line of stitching

4. Turn fabric to the right side. This may be quite tight (which is why we trimmed our seam allowances) so work slowly and gently, using a chopstick or similar to push the fabric through. Press with a hot steam iron.

5. Topstitch right around the edge of the teether, closing the turning hole.

6. Knot the fabric around the ring as follows:

7. Fold your fabric in half and pull the looped end half way through the wooden ring as shown above.  Fold the ends of the fabric back under the wooden ring and pass them through the looped end of your fabric:

8. Check that the fabric is lying nice and flat and pull tight. 

9. Turn the teether over and place a few stitches at the point where the two sides meet (see illustration below).  This will stop the fabric from sliding off but will still allow it to be removed for washing.

You're done.  All ready for munching!

I hope you enjoyed this tutorial.  I always love to hear your comments and see what you have made.  Get sharing with #WillowAndStitch on Instagram or add your photos to the Willow and Stitch Flickr pool.  

The Best (And Easiest!) Burp Cloth Tutorial.

Burp Cloth Tutorial

There’s nothing that says ‘new mum chic’ like milky stains on your shoulder, and while we wear them like a badge of honour, it’s sometimes nice to have your clothes stay clean for more than 5 minutes; and it’s always nice to cut down on the laundry a little.  Protect your clothes and add a touch of beauty to your day at the same time with these lovely (and very functional) burp cloths.

This project is so, so easy. In fact, given that they are made from old-fashioned cloth nappies I’m not even sure it really counts as sewing, but I’ve spent a lot of time trying out different designs and I’m convinced that these are the best. They’re big enough to protect from largish pukes, super absorbent and soft for wiping little chins. The fact that they’re so easy is just an added bonus.


You will need:

1 packet of cloth towelling nappies (you can buy these online or from most baby supplies stores)

1 62cm x 20cm piece of printed cotton fabric per towel

Note: These measurements work for standard sized cloth nappies: 60x60cm. If your nappies are a different size then calculate the size of fabric needed as follows:

The length is the length of your nappy plus 2cm.

The width is the width of your nappy divided by 3.

Cutting mat, rotary cutter and ruler (optional)


Before you start:

Use a 1cm seam allowance unless otherwise stated.

Remember to wash, dry and press all fabrics (and the cloth nappies) before cutting.


Directions:

1. Cut your decorative cotton rectangle(s). It is easiest to do this using a rotary cutter and cutting mat as you can ensure that your edges are straight and your corners are right angles.

2. Using an iron, press 1 cm to the wrong side along each edge of your fabric. Measure and mark the midpoint of each short end with a pin. Fig 1.

Burp Cloth fig 1

3. Find and mark the midpoint of 2 opposite sides of your cloth nappy.  With both pieces right side up, centre the fabric rectangle on one of the cloth nappies, aligning the middle of the fabric with the mid point of each edge of the cloth nappy. Pin in place right around the fabric.

4. Using a complementary coloured thread on top and a white thread underneath, topstitch a few millimetres from the edge right around your decorative fabric to secure it to the nappy.

Fabric Basket Tutorial

Happy New Year!

Before Christmas fades into distant memory I thought it'd be nice to share a tutorial for one of my favourite handmade gifts this year; these lovely little fabric baskets.  They are very quick and easy to make and there is no pattern needed.  The baskets can be made any size - I like them with a 16cm diameter, but the hubby was asking if I could make some which were waste paper basket sized, which of course you could.

I think they are also really nice as a little nested set of 2 or 3, with each one a few centimetres bigger than the one before it.  The tops can be folded down once or twice depending on the contents of the basket.

Don't you love this fabric combination?  These are actually some bits that I had left over from the Sew Liberated 'Gathering Apron' which I made a few weeks ago for myself - I'll take some pictures and post that soon too.

For the baskets, you will need:

Linen or hessian fabric for the outer

Printed cotton for the lining

Heavy weight fusible interfacing


Step 1: Calculate measurements and cut pattern pieces:

Choose a bowl or plate which is roughly the diameter which you want for your baskets and use it as a template for the base of the basket. Cut one each from the outer, lining and interfacing.

As we will be working with 1cm seam allowances, the base of your basket will eventually have a diameter which is 2cm less than the circle you have cut. Calculate the circumference of your basket by multiplying the the diameter (minus 2) by Pi (3.14). Then add 2cm for the side seam allowance. If only my high school maths teacher could have pointed out that maths would be useful for sewing patterns I might have paid more attention…

For example, I drew around a bowl which had a diameter of 18cm.

My basket diameter is 18 - 2 = 16cm.

The circumference of my basket will need to be 16 x 3.14 = 50cm approx

Add 2cm seam allowances: 50 + 2 = 52cm

So I need to cut a side piece with a length of 52 cm.

The height of the sides will be 1.5 x diameter of finished base; 1.5 x 16 = 24cm. This gives the basket a nice height and allows for the sides to be folded over at the top.

So, for the sides cut 3 pieces measuring 52 x 24, one each from the outer, lining and interfacing.

Step 2: Affix the interfacing and sew the outer and lining baskets.

Using a hot iron with no steam, fuse the interfacing to the outer basket pieces. The linen / hessian tends to stretch significantly on the bias so the interfacing stabilises it as well as adding structure to the basket.

Working first with the basket outer pieces, fold the edge piece along its length to bring both short edges together with right sides facing. Sew along the short edges with a 1 cm seam to form a tube. Press seam open.

Join base to edges.  With right sides together, place the base inside the tube, aligning the edge of the circle with the edge of the tube. Join the base to the sides with a 1cm seam. Work slowly, pulling the base around to match the edge of the sides. Lift the presser foot frequently (leave the needle down to keep your work in place) to allow the fabric to relax back into place. Sew all the way around the base.

Watch out for stray crocodiles while doing this...

Trim seams to a few mm then repeat to form the basket lining.


Step 3; Join the lining and outer pieces.

Turn the basket lining to the right side and place it inside the outer piece, with right sides together.  Push the lining right into the outer, ensuring that the bottom seams align. The outer edges should match up. Sew around the top of the basket leaving a 5cm hole for turning. Backstitch at either side of the turning.  

Pull the basket to the right side, through the turning hole.  Push the lining into the outer and press the sides, folding the fabric at the turning hole to the inside.  Topstitch right around the top of the basket, sealing the hole.

Fold the top of the basket down to show the lining on the outside. 

I have deliberately left them un-ironed (which may or may not be a real word) because I love the way they almost look like crumpled paper bags.   What do you think?  Would you have a go at making these? I'd love to see how you got on.  What was your favourite handmade gift this year?